Pages

Sunday, 30 November 2014

Stars Class Kits

Hi there.

Had lots of South Hills Designs parties and events over the last few weeks which has taken up lots of my time but I had a 'eureka' moment today and just had to have a little play.

We had our Stars Class last weekend where I showed the ladies how to assemble and decorate the 26 stars in the Many Merry Stars kit. We talked about ways of making the stars into gift boxes and this afternoon whilst driving to see Sara at the Wortley Hall Craft Fair I suddenly came up with an idea.

Instead of assembling them using all the tabs on the side strip to each point on the stars I cut some of the tabs off before assembly and here they are.

These are the boxes closed.


And here they are open.


The strips already have the adhesive on you just peal off the adhesive tape. This is how I cut the tabs off the strips.


The opening is quite small but it does allow you to get items inside- I will probably pad out the boxes with some tissue paper when I put gifts in. But if your filling with sweets it probably won't need anything.

Hope your having a great weekend.
Jan

- Posted using BlogPress from my iPhone

Tuesday, 25 November 2014


Join Stampin' Up! between 25 November – 2 December as a new demonstrator for some great deals inlcuding;
Get a 25% discount on the Starter Kit with all the same great products included AND 5% cash back on all commissionable orders you place in December.
  • Choose £130 of products from any current SU! catalogues for just £74.25
  • and get a business supply pack valued at £45 
  • and FREE postage on your starter kit
  • and then 5% cash back on December’s commissionable orders.
You’ll get to see and pre-order from the new Spring/Summer catalogue and Sale-a-bration when they are released to demonstrators on 6 December.  So the orders you place in December qualifying you for cash back, will also qualify you for Sale-a-bration freebies too!
We’re having a Paper Dolls team training meeting on Wednesday 3 December (or Monday 8 December on Facebook for those who can’t make the face to face meeting) so we can help you hit the ground running.
Call me on 07795566727 or email me for a chat.  This is a SERIOUSLY good deal
If you’ve been a demonstrator previously and dropped, you can rejoin – we’d love to have you back!
If you’re just too excited and can’t wait, then you can go ahead and click here to join now. You can do it online with just your personal contact and credit card payment information.
Simples...

Saturday, 8 November 2014

Commission for 40th Anniversary.

I had a commission to make a 40th wedding anniversary card last week and here is the finished card.


It is a 8x8" card blank from my stash and I used Real Red ink and cardstock to decorate.

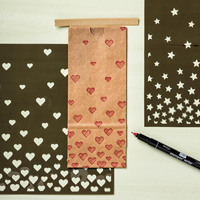
I used the hearts stencil and a sponge dauber to add the red hearts to the card blank making the hearts at the top darker than the bottom.  Then I used crystal effects on the hearts to give dimension and shine.

The hearts were die cut from Real Red and White cardstock then the flowers from Bloom with Hope stamped in Real Red ink before matting them onto the card blank.  I was very brave and stamped the 40th Anniversary by 'eyeballing' it (I forgot where I had put my stamp a ma jig!!!).  The 'happy' was stamped on a scrap of card then punched out with the Whats up punch (arrows).

The ribbon is just some from my stash as I couldnt find any real red (memo to self, tidy up the craft room!!!).
Table built using Stampin' Up! Product Table Builder from The Crafty Owl.


I stamped the inside of the card (sorry, I forgot to take a photo of the inside (doh!) but you can see the stamped image on the envelope.

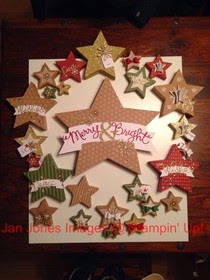
Don't forget, the early bird registration for the Stars Class (here) closes on Monday evening.  After then the class fee goes up £5.  Here is a reminder of the Stars Class project.
Have a fantastic weekend everyone!

Jan x

Thursday, 30 October 2014

Very Many Stars Class

Like stars? Want to make some lovely Christmas decorations?

Here is a brand new kit from Stampin Up! With 26 stars ranging from 38cm right down to 5cm.

Here's the set of stars I made using the kit which costs just £23.95.


Everything you need (except for adhesive) is included in the kit.

If you would like to learn how to make the stars, I am holding a class on 22nd November at 11am to 1pm. Now, one thing you do need to know, you will only finish 4-5 stars in the class - once you know how to make the stars you can finish them at home. I took about a day and a half to make them all up.

The Early Bird cost of the class is £30 if you book with me by the 10th of November.

The cost includes the full kit and adhesives to assemble the items in the class. Refreshments are also included.

I have to order the kits in time for the class so will be putting the order in for the 11th November.

Order after the 11th November and the cost of the class will be £35 (as I will need to order more kits and there will be an extra delivery charge).

Book early to get the best deal so contact me now to reserve your place.

Jan x

- Posted using BlogPress from my iPhone

Sunday, 26 October 2014

I'm back and crafting

Well, what can I say about Brussels..? Amazing, absolutely amazing.

The hotel was breathtaking. Here are a few photos.


Here's a couple of pics of my room.


Gorgeous, isn't it. Almost as good as the waffles,


Oh, and then there was Convention!

Not once but twice on stage - after five years attending, I finally made it. Just wish I had taken a photo on stage of the audience so I could keep looking at them - it went so quickly.


I'm all fired up now I'm back and have spent all weekend crafting and catching up with friends so bob back soon for details of my next classes - wait till you see the star class!

Jan x
- Posted using BlogPress from my iPhone

Wednesday, 15 October 2014

Phew, I've finally got everything sorted for my trip to Brussels for the 2014 European Stampin Up! Convention. 120 swaps done (more than I'd planned but hoping to get some nice ones back.

Here are the ones I made.


Now, normally when I make batches of cards I start to get a bit fed up but these cuties are so sweet I just kept going.

The dog card uses
Hot Diggity Dog stamp set, Neutrals DSP, Homemade Holiday Framelits dies (I cut the chimneys off to make tags) and Chocolate Chip ink. A mini brad is used to the top of the tag.

The cat card has
You Little Furball stamp set, Brights DSP, Homemade Holiday framelits and Pumpkin Pie ink.

I'll post more photos of the Framelits when I get back so come back soon got details.
Jan x

- Posted using BlogPress from my iPhone

Tuesday, 7 October 2014

Class Wreath

I've been flat out lately but here's a photo of the wreath I made in Saturdays class.


I used the last of my Mocha Morning DSP and although it was REALLY difficult to glue together, I love the result.

Each of the 3" circles were cut into the centre and then made into a cone shape. The cones were attached using a hot glue gun - and I only burnt myself once!!!

Here's a photo of a wreath I made a few years ago, it's made using 3" squares and is the same method the ladies used to make their wreaths in the class. Hope you had a nice time ladies?


- Posted using BlogPress from my iPhone